记录一下比赛中遇到的各种C/C++的反逆向技巧(主要是Windows API)
反调试技巧
NtQueryInformationProcess() / ZwQueryInformationProcess()
原理
两个都是Windows中检查并获取进程信息的函数 区别在于调用方式和调用权限 Zw需要在内核态调用 Nt在用户态调用 主要起到反调试作用的是第二个参数ProcessInformationClass
当该值为ProcessDebugPort(0x07)时返回缓冲区为-1(调试状态), 0(非调试状态)
当该值为ProcessDebugObjectHandle(0x1E)时返回缓冲区为一个调试对象句柄!=NULL(调试状态), NULL(非调试状态)
当该值为ProcessDebugFlags(0x1F)时返回缓冲区为0(调试状态), 1(非调试状态)
例子
[LineCTF BrownFlagChecker]
其中有一个函数如下:
1 | bool anti_debug() |
反制措施
直接patch掉整个函数的调用或者修改控制流使得用于检测调试的信息失效
NtSetInformationThread() / ZwSetInformationThread()
两者的分别与上述差不多 功能是设置信息而不是检查信息 当第二个参数为ThreadHideFromDebugger(0x11)时将附加的调试器取消
例子
[XCTF Destination]
其中一个预处理函数如下:
1 | void *__thiscall sub_413750(void *this) |
在创建线程处下断点调试到此处 可以看到aS数组储存的实际上是ZwSetInformationThread 而且第二个参数是0x11 这时在线程启动时调试器会被立刻取消
反制措施
将第二个参数patch为0
虚表 hook
C++类中各种成员在内存中的分布
以以下代码编译出的二进制文件为例:
1 |
|
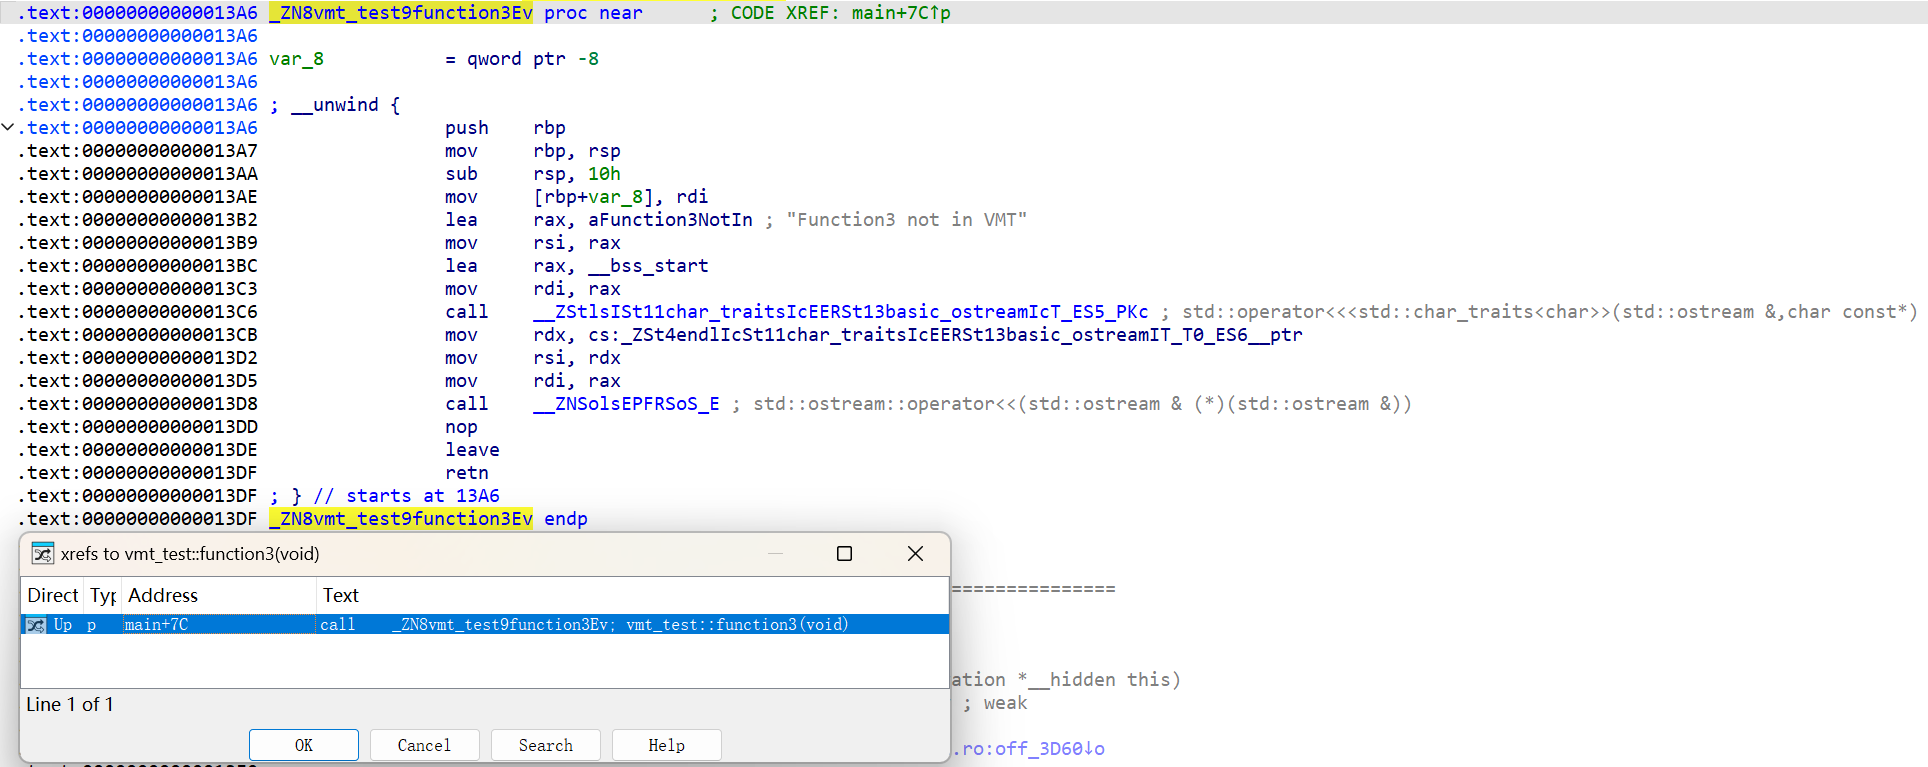
非虚成员函数
和普通函数一样没有区别 在.text段实现 不被除了调用处以外的地方引用:
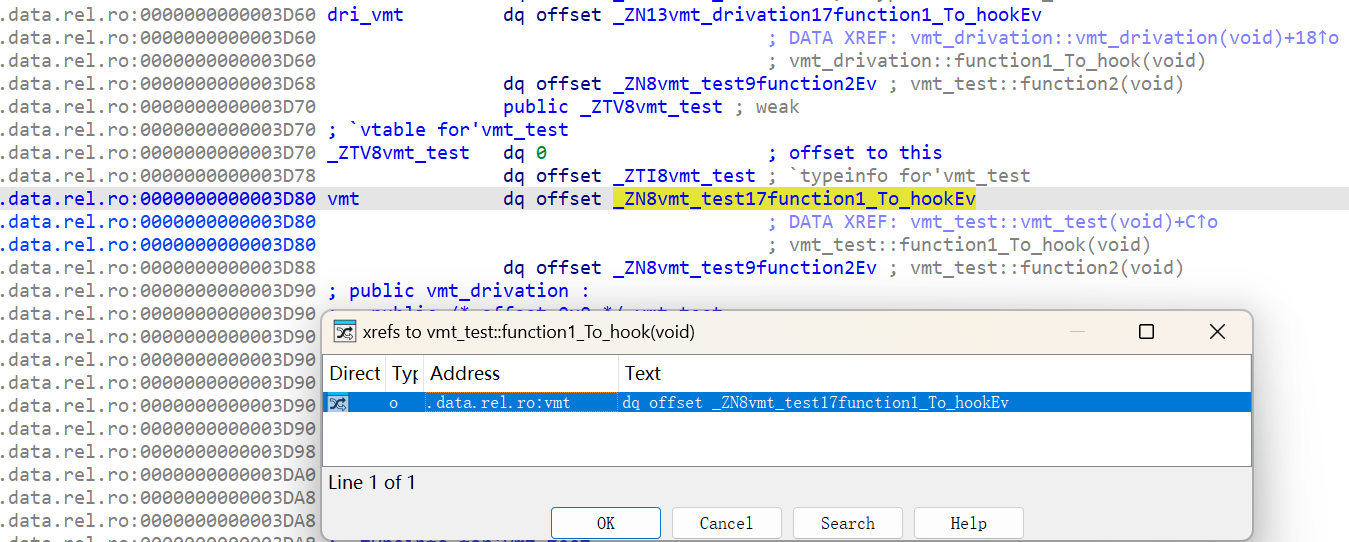
虚成员函数
在.text段实现 不会被调用处引用外且排列在VMT 即虚函数表中 在调用该函数时通过查表调用:
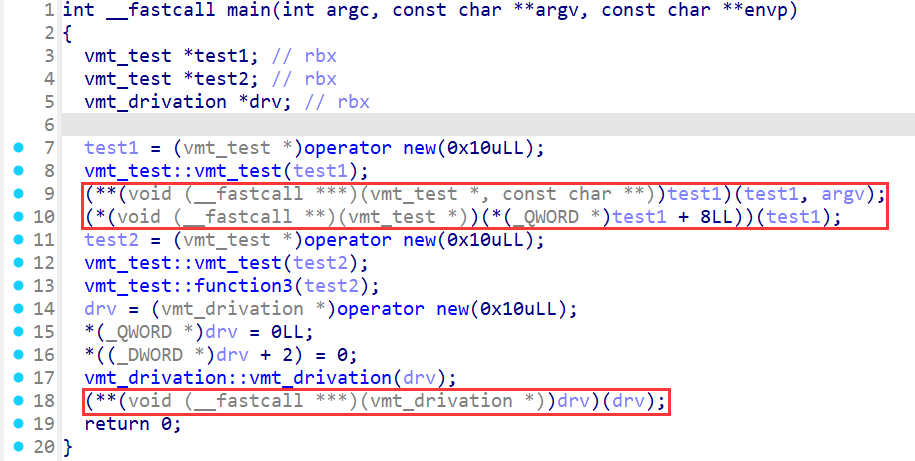
虚函数表相当于一个特殊的类成员变量 初始化时被赋值给实例的类对象偏移为0的位置:

继承类的虚函数
新建一张虚函数表 对已经实现的虚函数进行替换 没有实现的虚函数则引用原虚函数表中的对应函数 如果继承类没有自己的构造函数则调用基类的构造函数中将基类的VMT赋给偏移为0的内存 再在构造函数后用新的VMT覆盖:

成员变量
就像作为成员变量的VMT一样在构造函数中被依次赋值给偏移为n * sizeof(void *)的内存:

Hook虚函数
由于虚函数的调用都是间接的 而且VMT的地址和类的地址是绑定的 只需要将VMT中要hook的虚函数的地址替换为用户函数就能轻松实现hook 用以下代码编译出的二进制文件为例(编译时启用-fpermissive选项):
1 |
|
执行结果:
1 | .\test.exe |
特征
要使用VMT hook绕不开的一点就是改变某段内存的权限 因为VMT所在的数据段没有写入的权限 这时候在Windows系统上要使用VirtualProtect()进行提权 Linux上使用mprotect()进行提权
[2024 DASCTF八月开学季] ezcpp
以这题为例 它的VMT hook就非常的明显:
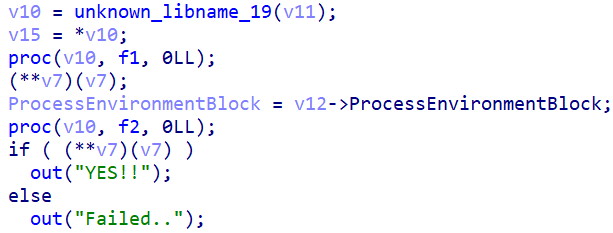

两次hook了v7的VMT中的第一个虚函数
C++异常处理
try{…}catch(…){…}
最简单的一种异常处理类型 IDA可以轻松识别出try{}块和对应的catch(){}块 以以下代码编译出的二进制文件为例:
1 |
|
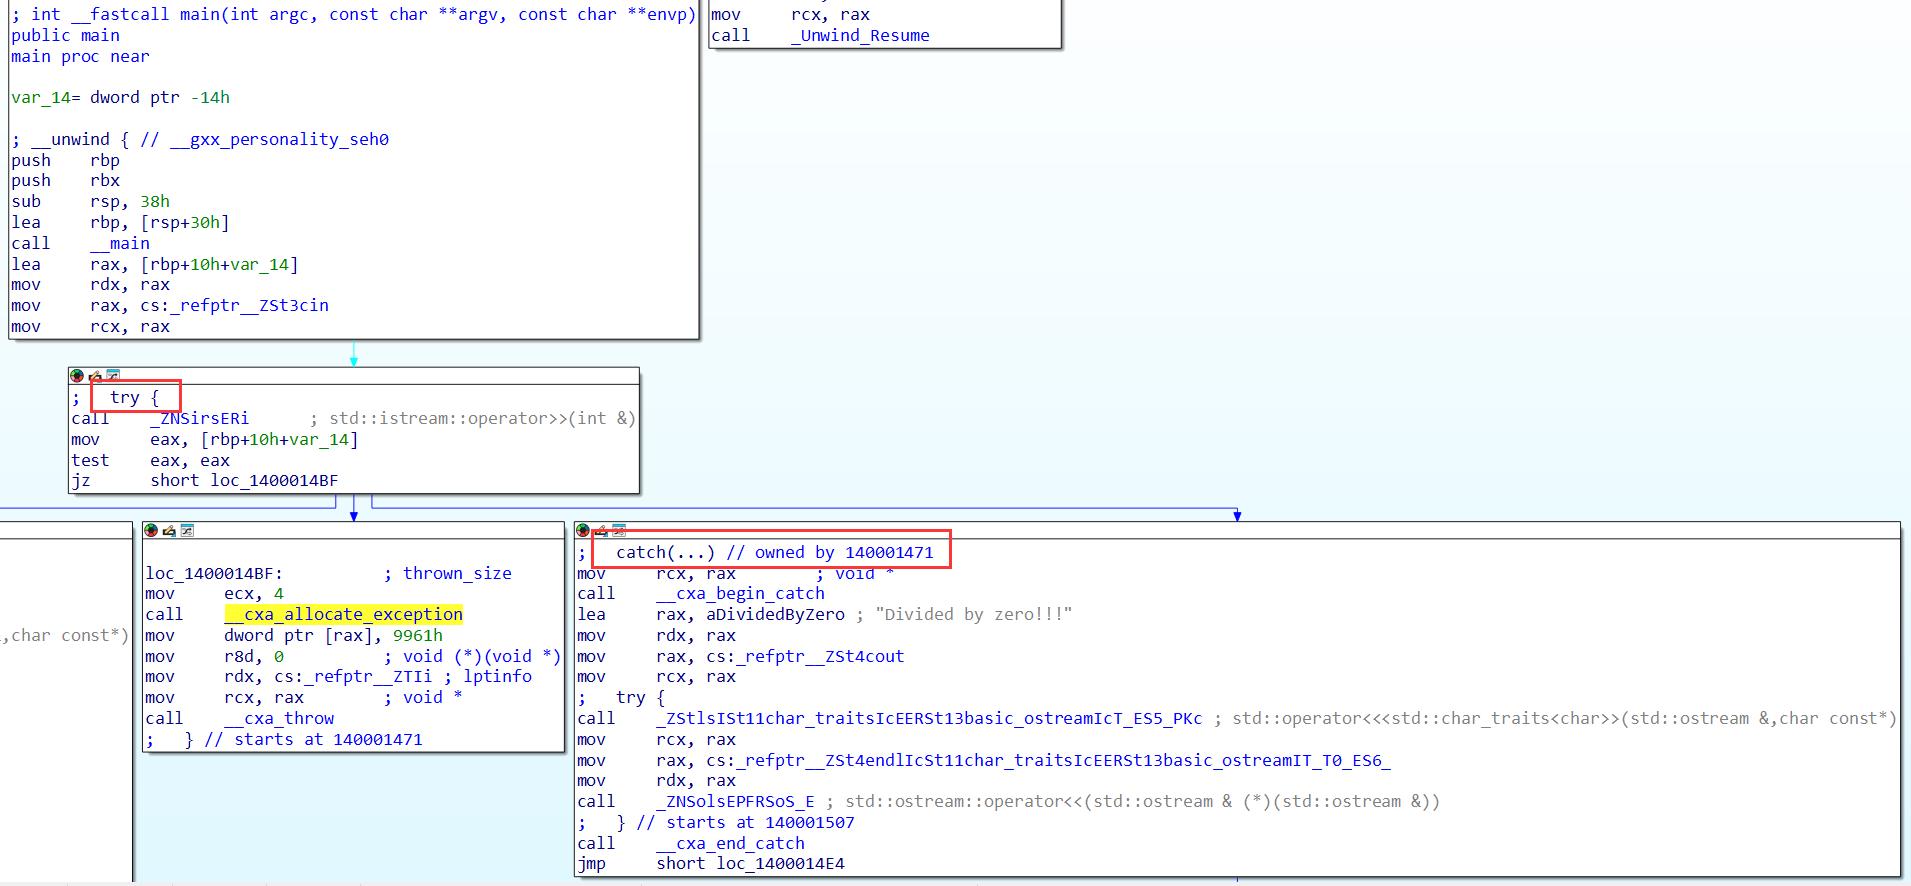
但是IDA的伪代码构造过程并不会将异常处理的部分进行反汇编并构造try-catch块 只会构造try的部分:
1 | int __fastcall main(int argc, const char **argv, const char **envp) |
应对的方法很简单 将throw关键字对应的汇编片段直接patch为jmp catch_block即可:
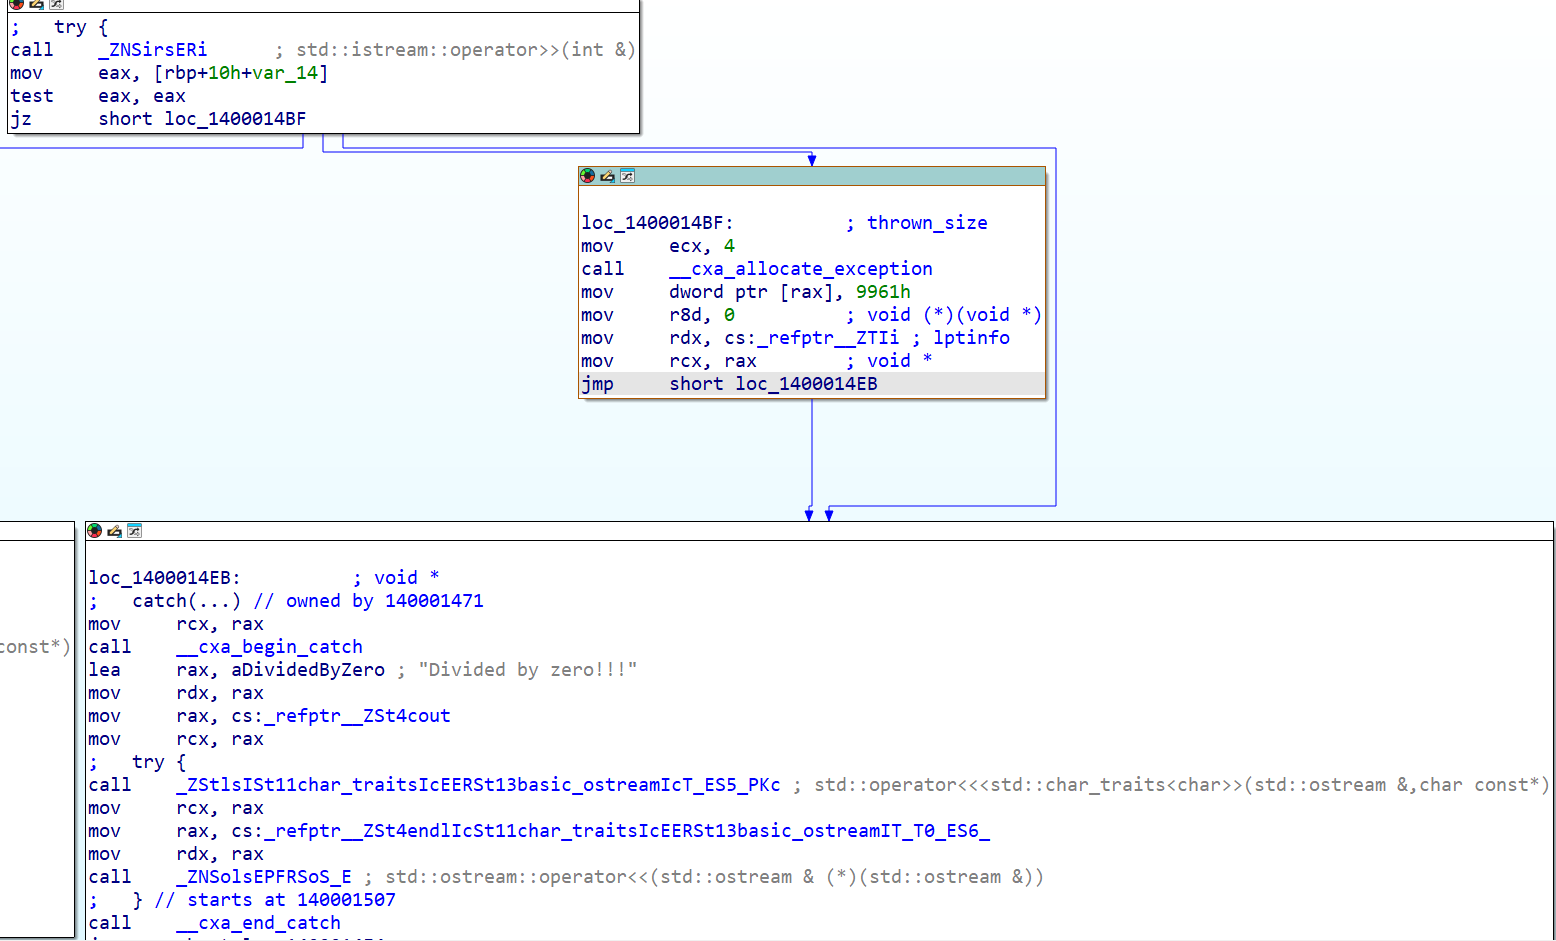
1 | int __fastcall main(int argc, const char **argv, const char **envp) |
但是这种通过异常处理隐藏控制流的方法局限性是很大的 第一点就是用throw关键字抛出异常这个特征太明显 而try-catch结构只能捕捉到throw关键字抛出的异常 其他的诸如内存错误和除零错误等是不会进行异常处理的 这就要提到下面这种异常处理方式
__try{…}__except(…){…} SEH
这是一种基于TEB(线程结构)的异常处理方式 具体可以参考结构化异常SEH处理机制详细介绍 可以捕获到出现的所有异常 以以下代码编译出的二进制文件为例:
1 |
|
安装Microsoft C++扩展工具后 用__except关键字可以指定发生异常时的异常处理函数 当__try块中发生异常时就会进入这个异常处理函数并将发生的异常号传入pExInfo->ExceptionRecord->ExceptionCode 和上面的异常处理一样 这种方法可以隐藏程序的控制流:
1 | __int64 __fastcall main() |
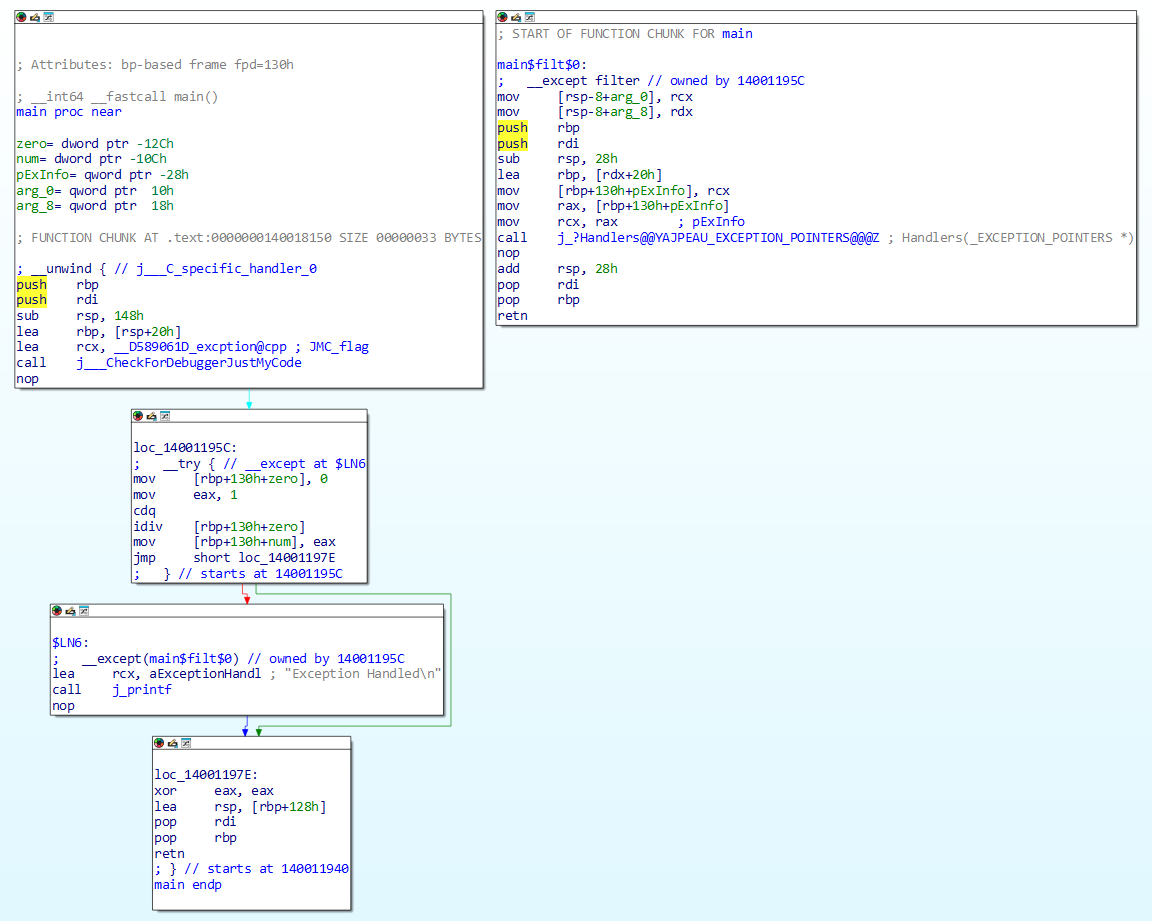
而且也和上面的异常处理一样在发生异常时即使是步入调试也会直接运行到下一个断点或程序结束 这时候要恢复控制流就需要识别哪部分是一定会发生异常的 并将那部分patch为调用异常处理函数 和跳转到__except块的jmp指令 但是这样做有明显的弊端:
- 不一定能确定那一部分会发生异常
- 会发生异常的部分不一定每次都发生异常
- 原来会触发异常的部分不一定有足够的空间用来patch成两条指令
所以目前我能想到比较好的处理方式是在异常处理函数的起始地址下断点来动态调试分析 而IDA是可以轻松识别出__except(handler())中的handler()的
最后附上所有Windows异常状态码
Debug-Blocker
实际上Debugblocker的思想非常简单 同时特征也十分明显 就是检测让程序启动并调试一个和自己一样的线程 这时候虽然两个线程运行的是同一个程序 但是主进程和子进程因为调试器附加判断(IsDebuggerPresent())执行的是完全不同的程序 而通过获取上下文 主进程对子进程的控制流是完全控制的 而子进程又可以通过触发异常来交由主进程处理的方式形成主进程的控制流 最后达成隐藏控制流的目的 同时因为子进程已经被附加了主进程这个调试器 正常来说是不可能再附加调试器了 从而进一步增加了逆向难度
用以下代码编译出的二进制文件为例:
1 |
|
启动线程时会直接触发一个CREATE_PROCESS_DEBUG_EVENT(0x3)的事件 当子进程触发除零异常时handler()就会获取当时的上下文并根据RAX(除数)来进行对应的处理 并在处理完后更改上下文中的RAX, RIP并设置:
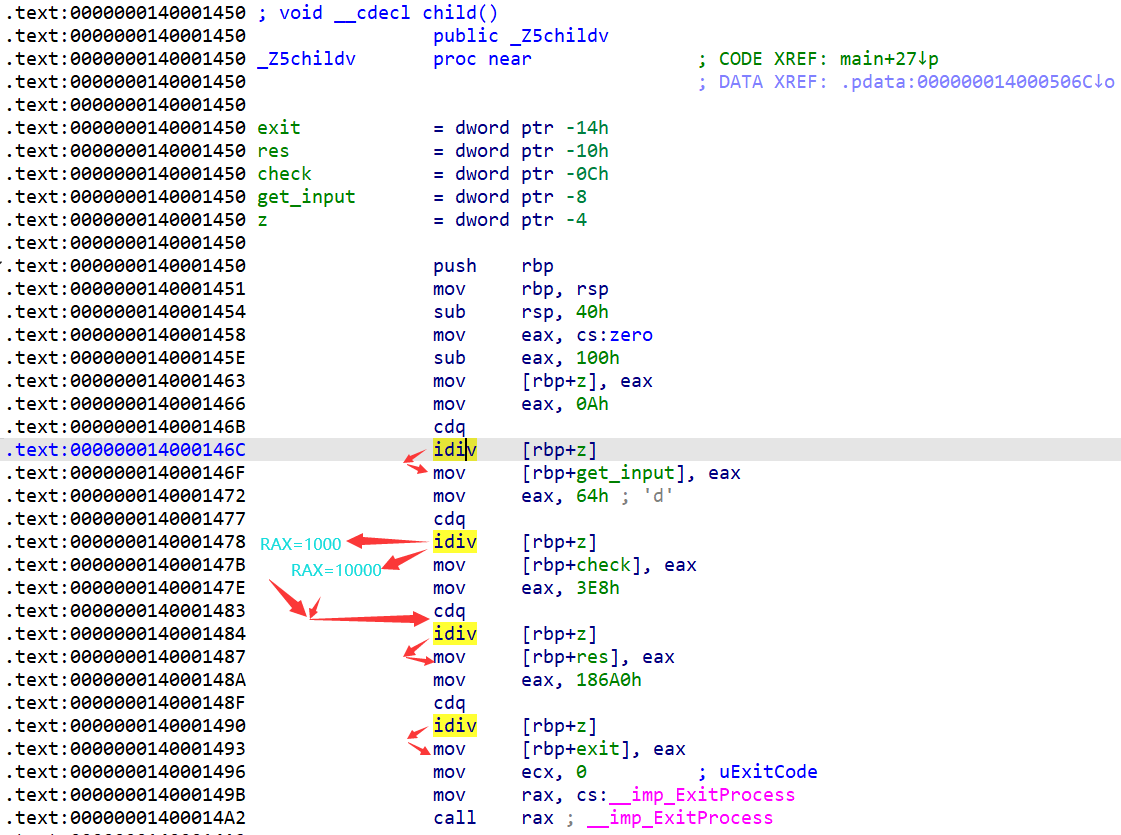
运行结果:
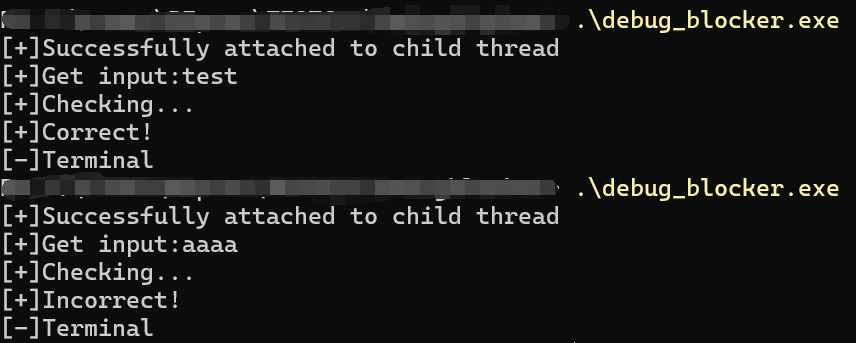
动态调试子线程的方法也很简单 Cheat Engine有一个DBVM功能 简单来说就是一个极简化的虚拟机 在里面运行Windows程序可以让CE的调试器附加到任意线程上 且不影响原程序的执行
[2024 LineCTF] BrownFlagChecker
直接看伪代码:
1 | void __noreturn child() |
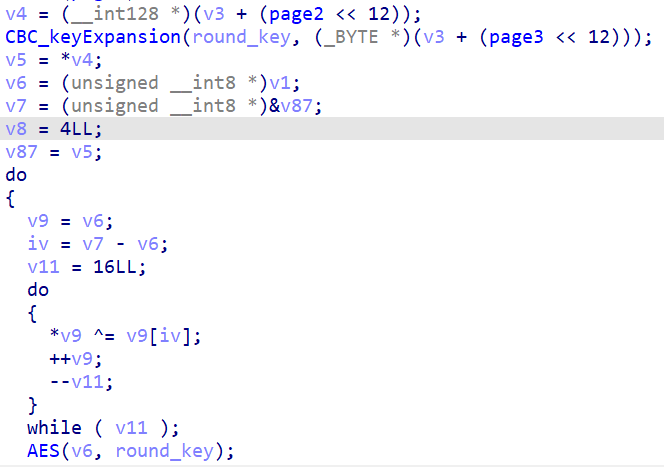
这一题就是如果不调试子进程就会非常困难的例子 本题的校验和加密全部在child()中 handler()只起到接收数据和初始化一些数据的功能 而正常来说Windows进程有自己独立的一块虚拟内存 不同进程之间不允许访问对方内存 所以这题通过一个驱动程序(.sys)直接得到所有数据的物理地址并进过一系列处理再传给child()中的vm()(太长不放) 当作AES加密的密钥和iv 而内核对内存资源的管理和使用要经过虚拟内存转物理内存再根据四级内存页来获取内存固定的最后几位进行组合 之后才能操作用户进程的资源 而且内核调试的前置条件比较多 所以选择用CE调试
开启DBVM需要先开启CPU虚拟化 这里用CE的Lua引擎使用CE的API来Hook AES密钥扩展步骤来获取密钥和iv

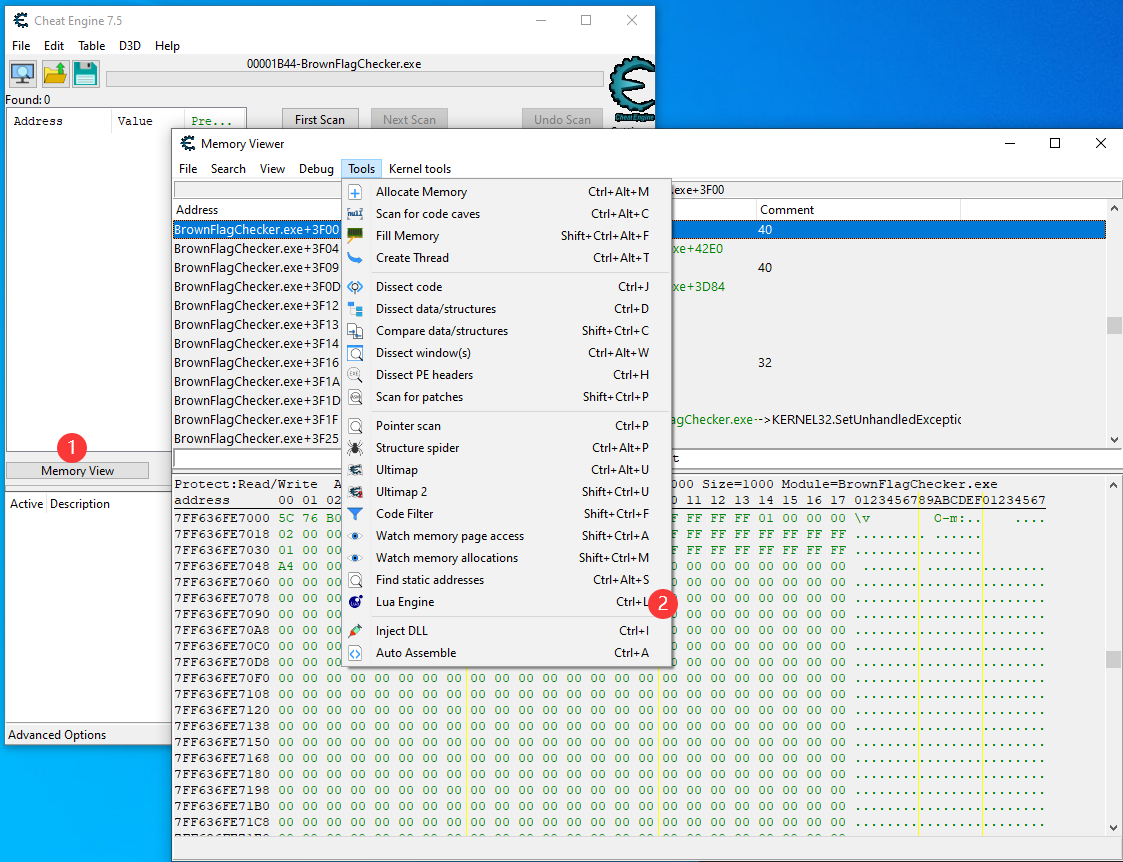
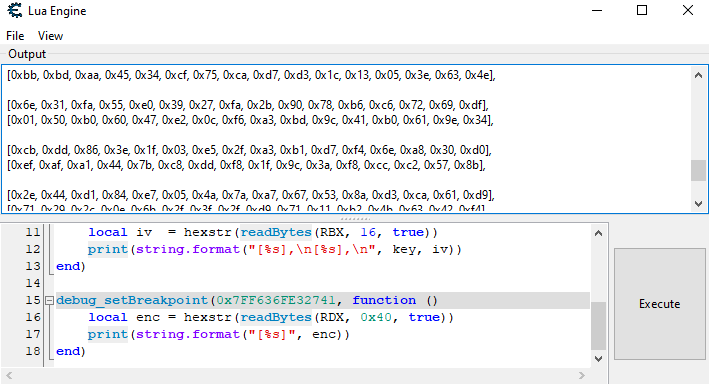
1 | function hexstr(bt) |
CE脚本相较于IDA脚本更容易编写 因为Lua引擎在导入脚本时自动加入了包括寄存器的全局变量可以直接使用
[2024 0xl4ughCTF] dance
对应Windows的WaitForDebugEventAPI Linux有ptrace系统调用 同样可以配合fork()来创建子程序以实现Debug-Blocker 而且相比Windows版本的 使用ptrace将使得父子程序之间的数据交流更加方便且更无懈可击
在着手解决题目前先简单了解一下ptrace相关的知识 简单来说
1 | long ptrace(enum __ptrace_request op, pid_t pid, |
会根据第1个参数request进行不同的操作 常用的有:
| request | function | addr | data |
|---|---|---|---|
| PTRACE_ATTACH | 附加到pid所指的子程序上 | / | / |
| PTRACE_CONT | 恢复子程序的运行 | / | 若传入非零值则为向子程序传递的信号(SIGNAL) |
| PTRACE_GETREGS | 获取当前子程序各个寄存器的值 | / | 一个指向struct user_regs_struct类型的指针用于存放获取到的寄存器值 |
| PTRACE_SETREGS | 设置当前子程序各个寄存器的值 | / | 一个指向struct user_regs_struct类型的指针用于存放要设置的寄存器值 |
| PTRACE_PEEKDATA | 从子程序addr指向的地址读取1个字(WORD)的数据到data指向的地址中 | 要读取的地址 | 要写入的地址 |
| PTRACE_POKEDATA | 从data指向的地址读取1个字(WORD)的数据到子程序addr指向的地址中 | 要写入的地址 | 要读取的地址 |
了解完ptrace后简单说明一下fork 相较于Windows上创建新进程从头执行再使用IsDebuggerPresent来判断子进程 fork在执行后直接就在另一块内存创建了一块大多数属性都与父进程相同的子进程 而在父进程中fork返回了子进程的pid 在子进程中返回了0
现在再看题目 主函数(ptrace原本是花指令实现的 修改函数名(成_ptrace)后IDA可以直接把它当成系统调用 第一个参数用宏表示了 IDA伟大 IDA门🙏):
1 | __int64 __fastcall main(int a1, char **args, char **a3) |
第一层blocker父进程没有根据子进程的行为执行代码 单纯为了反调试 子进程:
1 | __int64 __fastcall child(_BYTE *input) |
第二层blocker 可以看到子进程的流程比较清晰 创建了一个新的文件描述符并写入了一个库以供动态加载其中的check函数 稍后再解释父进程行为
这里尝试调试修改fork返回值来获取写入的库 但是其中都是INT 3中断指令:
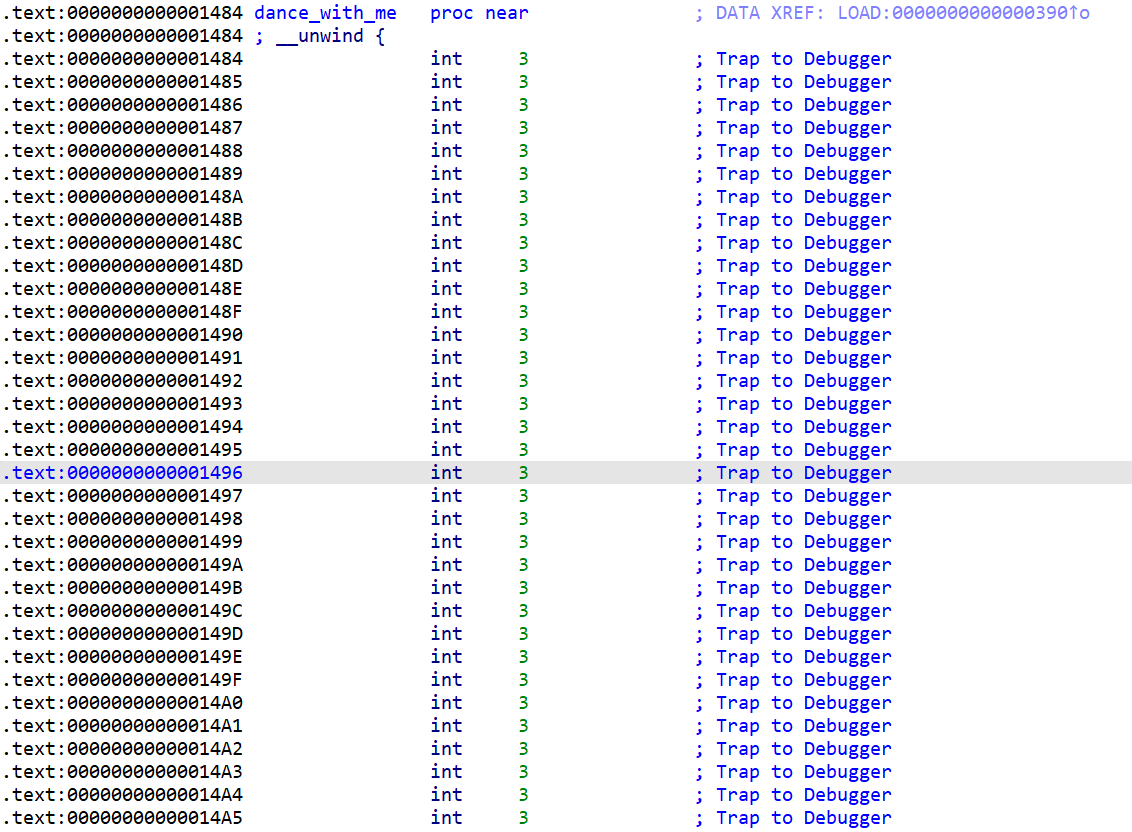
那么肯定是父进程动态patch了这个库 接下来我尝试将puts('nop');的失败判断patch成无限循环 然后再手动kill掉父进程再附加调试子进程来查看check函数 但是还是失败了 程序输出了i'm dead后直接退出
接下来只能硬分析父进程行为了 只看其中最核心的片段:
1 | ... |
其中根据内存特点定义了一个结构体 也就是inss的类型:
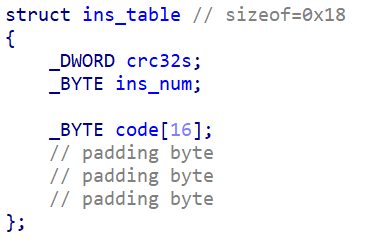
结合write_code()的内容大致推断父进程的行为:
当子进程发生异常时用一个类似CRC32的哈希函数计算异常发生点的内存地址低3位十六进制的哈希值 然后再在inss中查找这个hash 如果找到的话向异常发生点写入指令 在下一轮开头再向异常发生点写入INT 3指令达到无痕执行的目的
那么接下来的工作就是还原库:
1 | CRC32_table = [0x00000000, 0x77073096, 0xEE0E612C, 0x990951BA, 0x076DC419, 0x706AF48F, 0xE963A535, 0x9E6495A3, 0x0EDB8832, 0x79DCB8A4, 0xE0D5E91E, 0x97D2D988, 0x09B64C2B, 0x7EB17CBD, 0xE7B82D07, 0x90BF1D91, 0x1DB71064, 0x6AB020F2, 0xF3B97148, 0x84BE41DE, 0x1ADAD47D, 0x6DDDE4EB, 0xF4D4B551, 0x83D385C7, 0x136C9856, 0x646BA8C0, 0xFD62F97A, 0x8A65C9EC, 0x14015C4F, 0x63066CD9, 0xFA0F3D63, 0x8D080DF5, 0x3B6E20C8, 0x4C69105E, 0xD56041E4, 0xA2677172, 0x3C03E4D1, 0x4B04D447, 0xD20D85FD, 0xA50AB56B, 0x35B5A8FA, 0x42B2986C, 0xDBBBC9D6, 0xACBCF940, 0x32D86CE3, 0x45DF5C75, 0xDCD60DCF, 0xABD13D59, 0x26D930AC, 0x51DE003A, 0xC8D75180, 0xBFD06116, 0x21B4F4B5, 0x56B3C423, 0xCFBA9599, 0xB8BDA50F, 0x2802B89E, 0x5F058808, 0xC60CD9B2, 0xB10BE924, 0x2F6F7C87, 0x58684C11, 0xC1611DAB, 0xB6662D3D, 0x76DC4190, 0x01DB7106, 0x98D220BC, 0xEFD5102A, 0x71B18589, 0x06B6B51F, 0x9FBFE4A5, 0xE8B8D433, 0x7807C9A2, 0x0F00F934, 0x9609A88E, 0xE10E9818, 0x7F6A0DBB, 0x086D3D2D, 0x91646C97, 0xE6635C01, 0x6B6B51F4, 0x1C6C6162, 0x856530D8, 0xF262004E, 0x6C0695ED, 0x1B01A57B, 0x8208F4C1, 0xF50FC457, 0x65B0D9C6, 0x12B7E950, 0x8BBEB8EA, 0xFCB9887C, 0x62DD1DDF, 0x15DA2D49, 0x8CD37CF3, 0xFBD44C65, 0x4DB26158, 0x3AB551CE, 0xA3BC0074, 0xD4BB30E2, 0x4ADFA541, 0x3DD895D7, 0xA4D1C46D, 0xD3D6F4FB, 0x4369E96A, 0x346ED9FC, 0xAD678846, 0xDA60B8D0, 0x44042D73, 0x33031DE5, 0xAA0A4C5F, 0xDD0D7CC9, 0x5005713C, 0x270241AA, 0xBE0B1010, 0xC90C2086, 0x5768B525, 0x206F85B3, 0xB966D409, 0xCE61E49F, 0x5EDEF90E, 0x29D9C998, 0xB0D09822, 0xC7D7A8B4, 0x59B33D17, 0x2EB40D81, 0xB7BD5C3B, 0xC0BA6CAD, 0xEDB88320, 0x9ABFB3B6, 0x03B6E20C, 0x74B1D29A, 0xEAD54739, 0x9DD277AF, 0x04DB2615, 0x73DC1683, 0xE3630B12, 0x94643B84, 0x0D6D6A3E, 0x7A6A5AA8, 0xE40ECF0B, 0x9309FF9D, 0x0A00AE27, 0x7D079EB1, 0xF00F9344, 0x8708A3D2, 0x1E01F268, 0x6906C2FE, 0xF762575D, 0x806567CB, 0x196C3671, 0x6E6B06E7, 0xFED41B76, 0x89D32BE0, 0x10DA7A5A, 0x67DD4ACC, 0xF9B9DF6F, 0x8EBEEFF9, 0x17B7BE43, 0x60B08ED5, 0xD6D6A3E8, 0xA1D1937E, 0x38D8C2C4, 0x4FDFF252, 0xD1BB67F1, 0xA6BC5767, 0x3FB506DD, 0x48B2364B, 0xD80D2BDA, 0xAF0A1B4C, 0x36034AF6, 0x41047A60, 0xDF60EFC3, 0xA867DF55, 0x316E8EEF, 0x4669BE79, 0xCB61B38C, 0xBC66831A, 0x256FD2A0, 0x5268E236, 0xCC0C7795, 0xBB0B4703, 0x220216B9, 0x5505262F, 0xC5BA3BBE, 0xB2BD0B28, 0x2BB45A92, 0x5CB36A04, 0xC2D7FFA7, 0xB5D0CF31, 0x2CD99E8B, 0x5BDEAE1D, 0x9B64C2B0, 0xEC63F226, 0x756AA39C, 0x026D930A, 0x9C0906A9, 0xEB0E363F, 0x72076785, 0x05005713, 0x95BF4A82, 0xE2B87A14, 0x7BB12BAE, 0x0CB61B38, 0x92D28E9B, 0xE5D5BE0D, 0x7CDCEFB7, 0x0BDBDF21, 0x86D3D2D4, 0xF1D4E242, 0x68DDB3F8, 0x1FDA836E, 0x81BE16CD, 0xF6B9265B, 0x6FB077E1, 0x18B74777, 0x88085AE6, 0xFF0F6A70, 0x66063BCA, 0x11010B5C, 0x8F659EFF, 0xF862AE69, 0x616BFFD3, 0x166CCF45, 0xA00AE278, 0xD70DD2EE, 0x4E048354, 0x3903B3C2, 0xA7672661, 0xD06016F7, 0x4969474D, 0x3E6E77DB, 0xAED16A4A, 0xD9D65ADC, 0x40DF0B66, 0x37D83BF0, 0xA9BCAE53, 0xDEBB9EC5, 0x47B2CF7F, 0x30B5FFE9, 0xBDBDF21C, 0xCABAC28A, 0x53B39330, 0x24B4A3A6, 0xBAD03605, 0xCDD70693, 0x54DE5729, 0x23D967BF, 0xB3667A2E, 0xC4614AB8, 0x5D681B02, 0x2A6F2B94, 0xB40BBE37, 0xC30C8EA1, 0x5A05DF1B, 0x2D02EF8D] |
得到修复库:
1 | _BOOL8 __fastcall dance_with_me(char *a1) |
还是一个chacha20加密 高级版RC4 自己写一个程序来动态加载它并用密文当输入就能得到明文了:
1 |
|
同时能发现为什么之前不能直接patch程序来获得库了 加载库时执行的全局构造函数以及check函数中都对原程序的完整性进行了验证:
1 | __int64 anti_patch() |
调试时修改一下RIP直接绕过即可 最后在调用encrypt时将RSI改为密文地址就能在加密后得到flag了
[2025 DASCTF 6月] xuans
这个叉幽欸嗯埃斯真的是一条纯纯的野狗
题目给的附件是静态编译的 还去除了符号表 用IDA feeds恢复部分符号表:

剩下一些看得出来的手动恢复 ptrace函数自己命名后可以对第一个参数右键选择菜单中的Auto Enum IDA会显示宏的名字而不是常数 手动恢复完之后先看看子线程做了什么:
1 | int __fastcall main(int argc, const char **argv, const char **envp) |
一开始就向自身线程发送了一个SIGSTOP(0x13) 这个操作会让线程挂起 等待接收到一个SIGCONT(0x12) 这里就是挂起线程等待主线程通过ptrace进行操作
后续接收用户输入后加密和密文比较
再看看主线程的操作:
1 | if ( pid ) |
其中需要提到的只有call_func 其他函数基本上就是封装起来的ptrace实现功能:
1 | __int64 __fastcall call_func( |
实际上定义了寄存器结构体之后就很清晰了 子线程的参数通过主线程第3个参数传入并且修改返回地址[RSP]为0 直接修改子线程RIP到要调用的函数上 调用完成后子线程就会尝试返回到无效地址0 此时会发出一个段错误信号SIGSEGV(0xb) 而主线程判断子线程是否执行完函数是判断watipid的状态码是否为0xb7f(#define __W_STOPCODE(sig) ((sig) << 8 | 0x7f)) 后续将执行调用函数前的寄存器写回去 实际上就是一个RPC hook远程调用
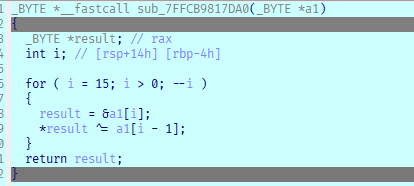
现在再看主线程执行的操作就清晰多了 获取自己和主线程的基址后得到子线程中mmap的位置后调用 将shellcode写入mmap返回的地址后调用shellcode shellcode的参数是一个全局变量 这个全局变量被写到了mmap返回的地址+0x100的位置 然后这个全局变量覆盖掉子线程中对应的全局变量 后续子线程使用到了这个全局变量来生成一个key 调试得到shellcode的作用:
注意到主线程在获取子线程的mmap地址的同时还获取了memcmp的地址 这就关系到主线程对子线程的最后一个操作了 向memcmp的第一个字节写入0xE9(jmp) inline hook子线程最后的校验逻辑 这里静态分析不好获得实际上调用的真正校验逻辑的位置 通过调试获取
IDA调试Debug-Blocker还是很烧脑的 这里使用gdb
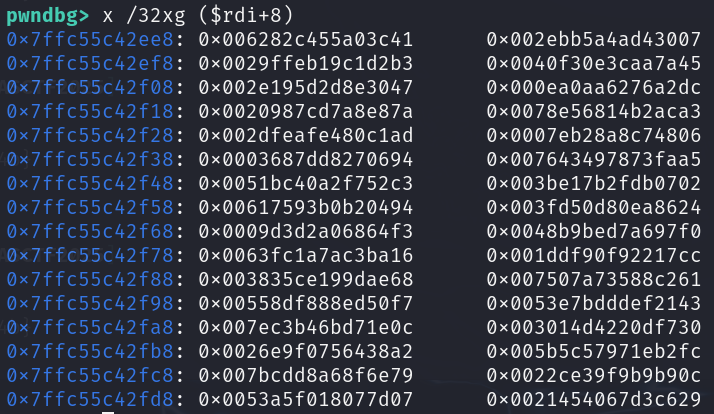
主线程在子线程获取输入之前就已经完成所有操作并detach了 所以可以直接启动程序然后attach子线程 执行加密下一个断点 校验下一个断点 然后恢复子线程进行输入 完成后应该就会断在加密的位置 获取到key:
在校验的断点步进获得inline hook的跳转地址:

实际上的校验逻辑 根本用不到密文:
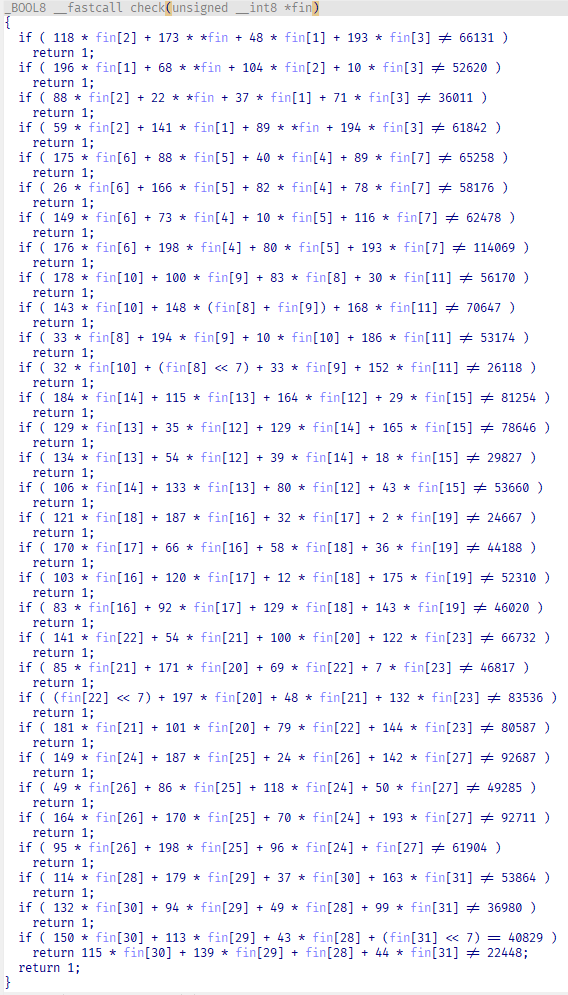
剩下来的就剩分析加密逻辑了 flag长度为0x20 被分成了两个0x10长度的部分分别加密 核心逻辑:
1 | __int64 __fastcall table(int a1) |
实际上table里面的东西就没必要看了 因为第enc[n]只需要知道第enc[n+1~4]和key[n]就能解出来了 最终密文是加密了32轮后的enc[32~35] 直接倒着解回enc[0~3]即可获得正确输入 难点是解出密文 直接用z3解会发现有多解 这里使用numpy的逆矩阵解法 需要先处理一下原始数据(一顿正则猛猛造就完了) data.txt:
1 | 118_2 173_0 48_1 193_3|66131 |
exp如下:
1 | with open('data.txt', 'r') as f: |
1 |
|
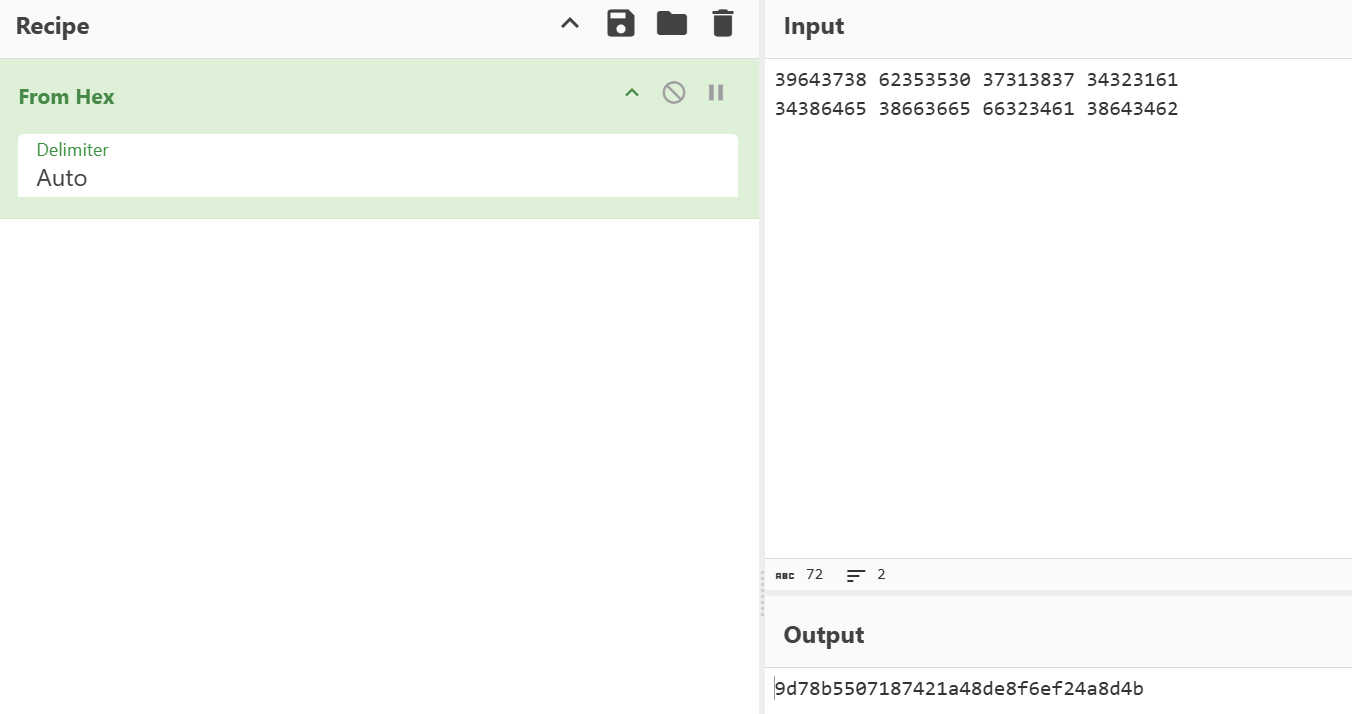
C-style float
众所周知C中的浮点数按照IEEE754规则存储在内存中 这里不介绍各种神必的数学上的加密方式 只介绍一些C浮点数的性质
-0.0
当一个浮点数在内存中存放的全部字节都是b'\x00'时 按照IEEE754规则这个浮点数就是2^-126 但是因为显示精度有限所以通常就认为是0.0 同理当符号位是1时这个值就是-0.0 这些都是显而易见的
但是当0.0和-0.0之间进行运算时结果就超出常理了
用以下代码编译的程序验证除了除法运算之外的结果:
1 |
|
得到结果:
1 | 0.0 + 0.0 = 0.0 |
将其中的-0.0和0.0分别替换为1和0 就能将浮点数的加减乘运算转为布尔运算:
1 | A + B ==> A & B |
利用这一点以及目前的反汇编器难以表现出这类浮点数之间的运算就能实现对某些加密算法的隐藏
[WWCTF floats]
题目要求从命令行传入长度为0x20的flag 其中每0x10 bytes的flag会被转为__int128然后进行一系列处理 首先是根据每一位来创建一个浮点数 如果这一位是0那么这个浮点数就是-0.0否则为0.0:
1 | for ( i = 0; i <= 127; ++i ) |
然后对这些1位进行了16轮某种处理:
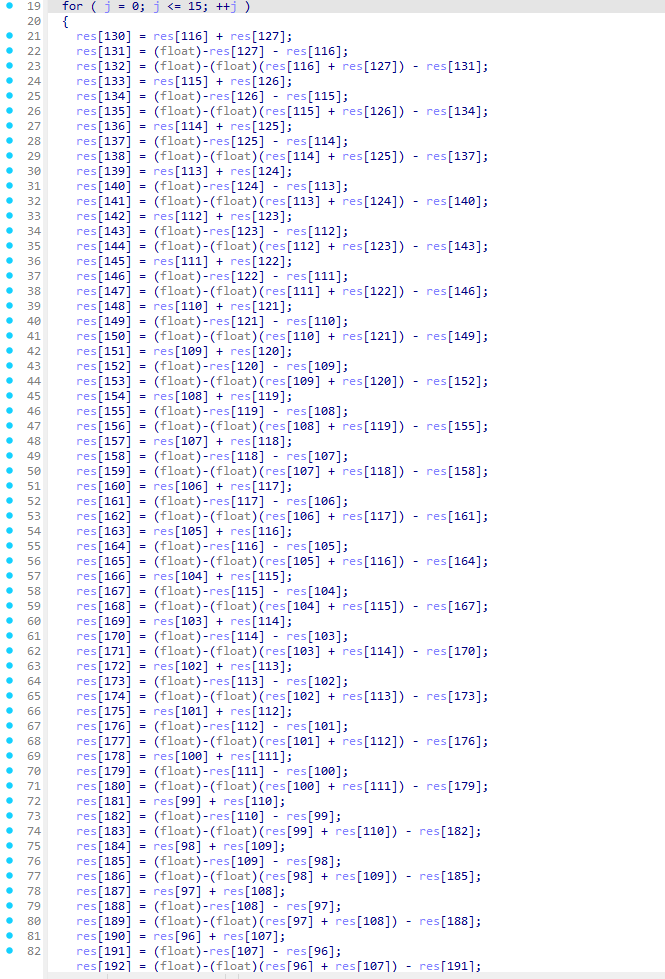
最后对结果中的位相互运算得到结果:

显然直接进行逆运算得到正确flag十分困难 先看看汇编:
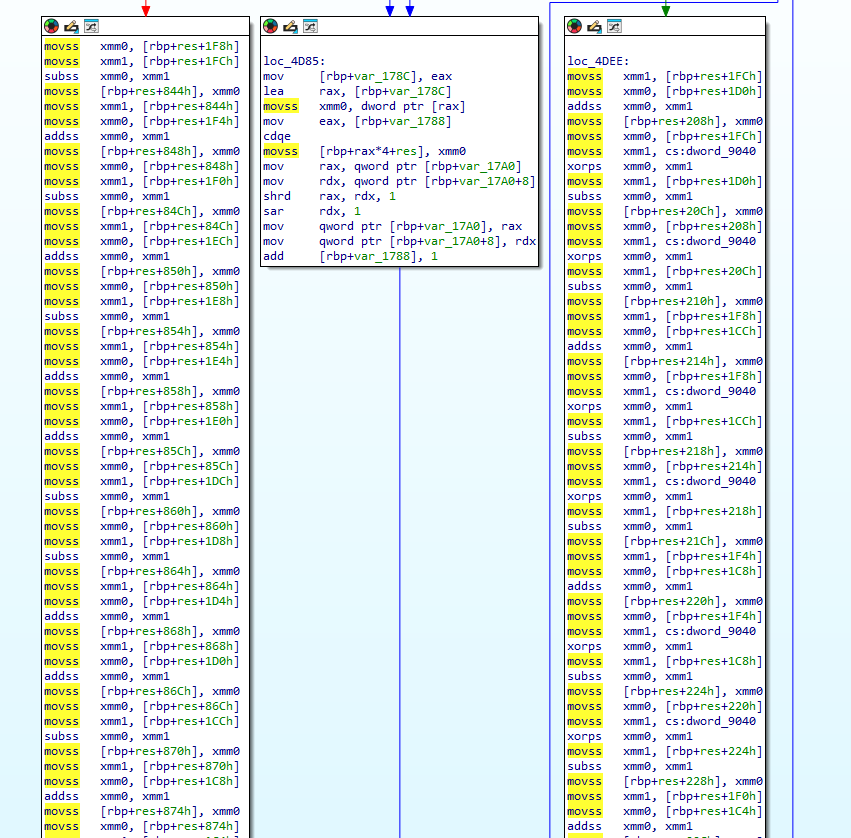
可以看到除了移动指令之外只用到了加, 减和异或运算 按照上面的结论直接模拟程序的运行来用z3解
先得到两个check函数的汇编:
1 | from idc import * |
进行初步处理得到方便执行的指令:
1 | with open("DisAsm_cheak2().txt", "r") as f: |
模拟执行后用z3解:
1 | def NewPlus(A, B): |
最后才发现既然都要模拟执行了为什么不用Angr呢(